Viva presentation prep

My viva presentation prep included my field 5 projects (object and BTBC) evaluation and my digital portfolio for this terms project.

Even though the presentation is about evaluating our experience and development during our two projects, I didn’t want my slides to be text heavy. Luckily, during my time in Uni, I have made sure to always take photos of my progress during these times or important information that I know will help me later on. With these photos I am able to create a presentation that isn’t too text heavy nor boring as there are images to explain my progress and development within both projects.

My presentation for these two projects were basic but straight to the point which I think would explain clearly what happened and my thoughts towards them. My other half of the presentation was my digital. I feel that this part is also clear on where my project took me and what key features I wanted to look into.

online tutorials

During this pandemic we have been having online tutorials as our lectures. At first, it was quite challenging to familiarise myself with the online tutorials as it was all very different to what I am normally used to. However, during each tutorial it has gotten easier except the slight WIFI issues at home.

Our online tutorials consist of digital work, weekly meetings and 1:1 tutorials.

During our tutorials we looked into, creating a range plan professionally and how we should lay it out for our digital work. With this technique, I found it quite fun as I feel as though my strong point is digital and I love to create designs in my spare time outside of uni. From learning this new technique, I went and created my range plan straight away.

Here are below the examples Our tutor showed us and my range plan I created.

We also looked into how to lay out our pages for an online portfolio, creating bleed lines and several pages. I found this really useful as well as I forgot how to do this technique. After this we were briefly shown how to use indesign for a potential look book and followed through the tutorial to create our own.


Work shops during Uni

At the beginning of this project, whilst in uni we were given workshops with one of our tutors on the creative side of making. These work shops included, heat press with  fabric ink and cooking this special type of fabric which made it crumple up and give a lovely effect to it.

The first workshop was the special fabric. With this technique we had to use the fabric with a silk fabric and sew patterns or lines onto them and then stick them into a heated oven for a minute or so to get the desired look. This is an example of the tutor made and two pieces I created.

The next workshop we did was heat press.

With this technique we had to use fabric ink and paint onto pieces of paper. After this, we would then place a piece of fabric into a cutout card and wedge it together with the inked paper into the heat presser. Once this is Done you would have to wait a few minutes before taking it out.

With these workshops, I found it really useful as I was already looking into fabric manipulation as one of my potential key features for my mini collection. 

From these workshops and the inspiration of Alexander McQueen’s new collection, I was really inspired to create my own type of print using ink dye and cotton fabric. With this technique, all I did was apply the ink using sponges and water to dilate some of the inn, creating a abstract piece.

fabric development

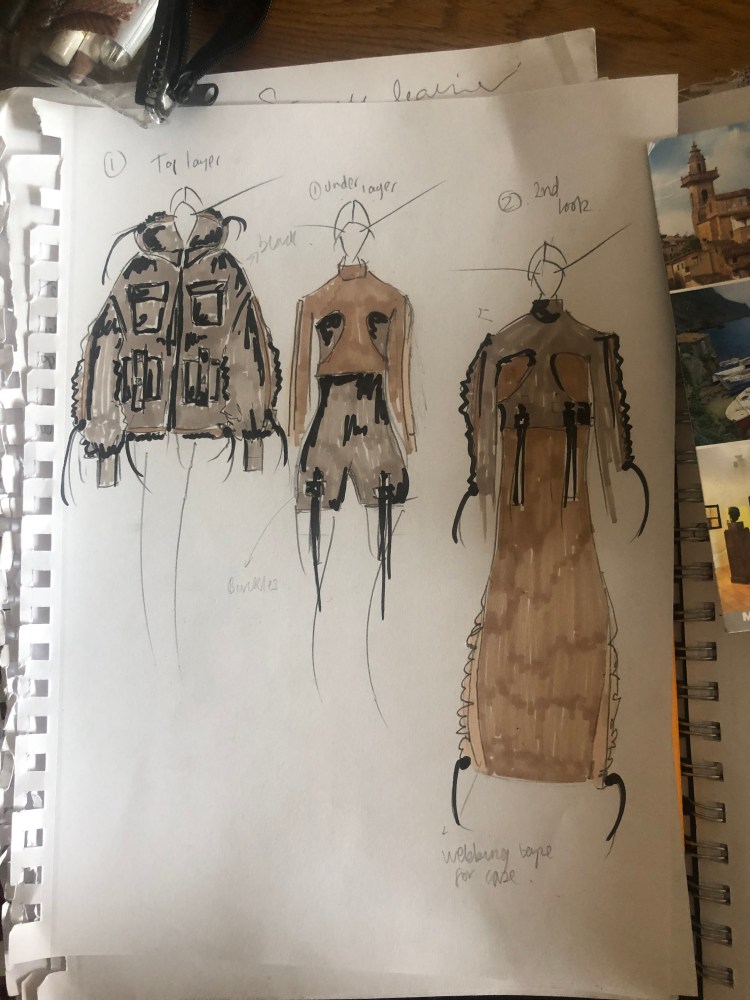
Creating pattern pieces for my designs were the next step within this development. As my jacket, dress and top were already made up in a block piece I was able to use these pieces but tweak them to my style, meaning the making part of the pieces was quite easy compared to my other pattern pieces I have made.

After this I was able to create my toiles. I found this quite difficult with the obvious circumstances of us being at home doing this. This meant some of my toiles didn’t work out as I planned meaning I had to improvise and re think on what I could do. However, even though this was the case, I decided to get on with the pieces I could do first then come back to the others.

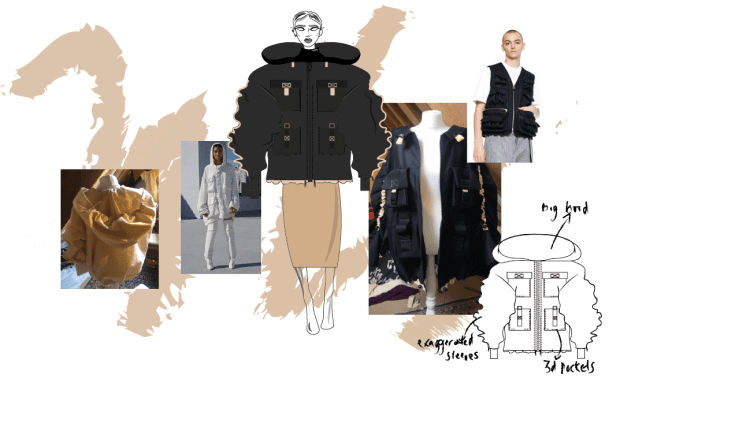
The first piece I made was the jacket. This garment took a while to make as there was a lot to do like, facing, adding zips in, putting cases in for elastic, 3d pockets and so on. Within time, the jacket slowly began to form and looked really good as shown below.

I am really pleased with the toile version of my jacket, under the circumstances of our situation with Uni being closed.

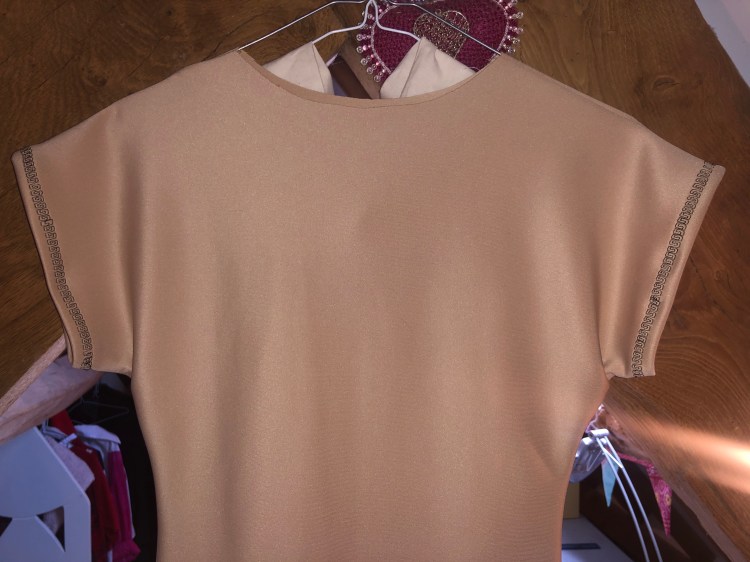
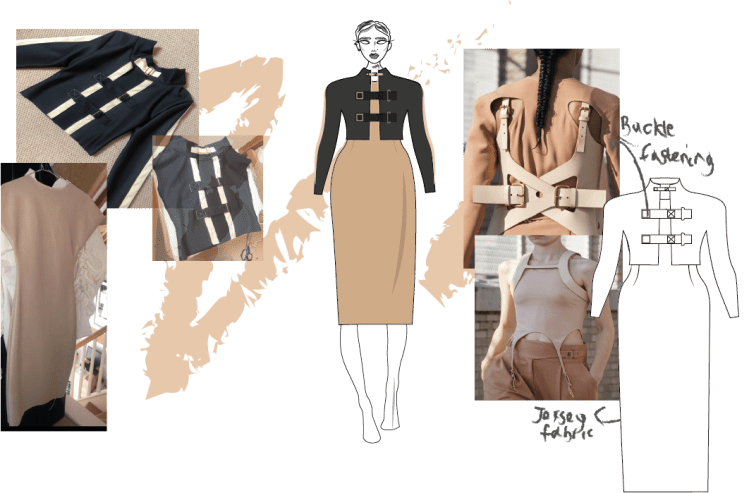
After I made the jacket, I created the dress and cut out top shown below.


With the dress, I did not create the facing on this as I thought there was no point for the toile, but I did write on it to remind myself to do so with the real dress.


With the top I created a high neck to add onto it as I wanted this to show underneath the jacket for an effect.  Coming back to the top, I decided due to circumstances I wanted to change the style of top.  I Wasn’t too sure on what I wanted to change, so I experimented with my real fabric choice when making the top.

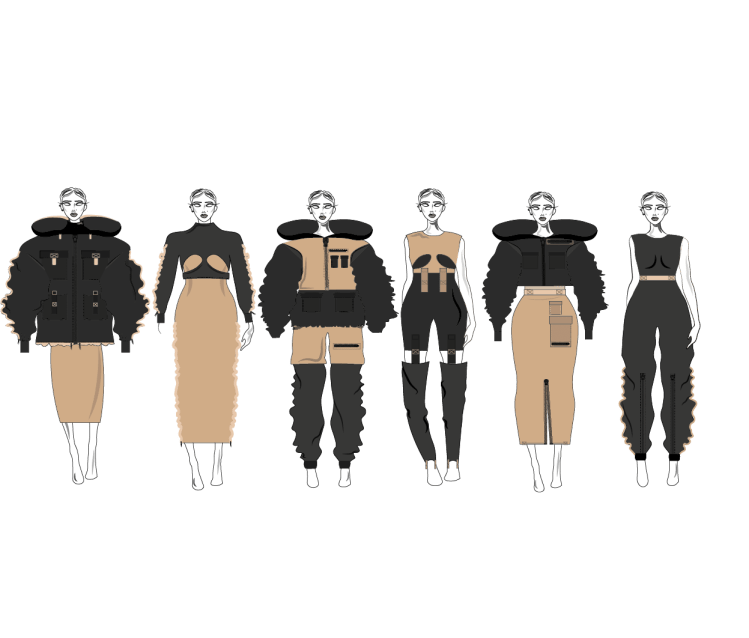
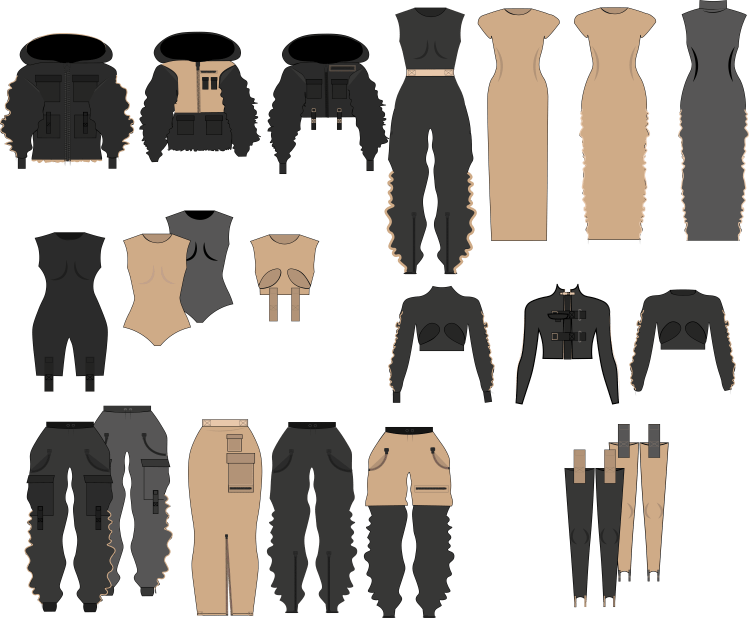
Once I had completed these as toile versions, I created the jacket and dress in the real fabric. For these garments, I went with Cotton drill fabric for the jacket with cream webbing tape as the casing, the dress and top would be made of scuba jersey fabric in black and nude.

Creating the jacket again was easy as it was all the exact same, however, I did make a few mistakes which I had to mend.


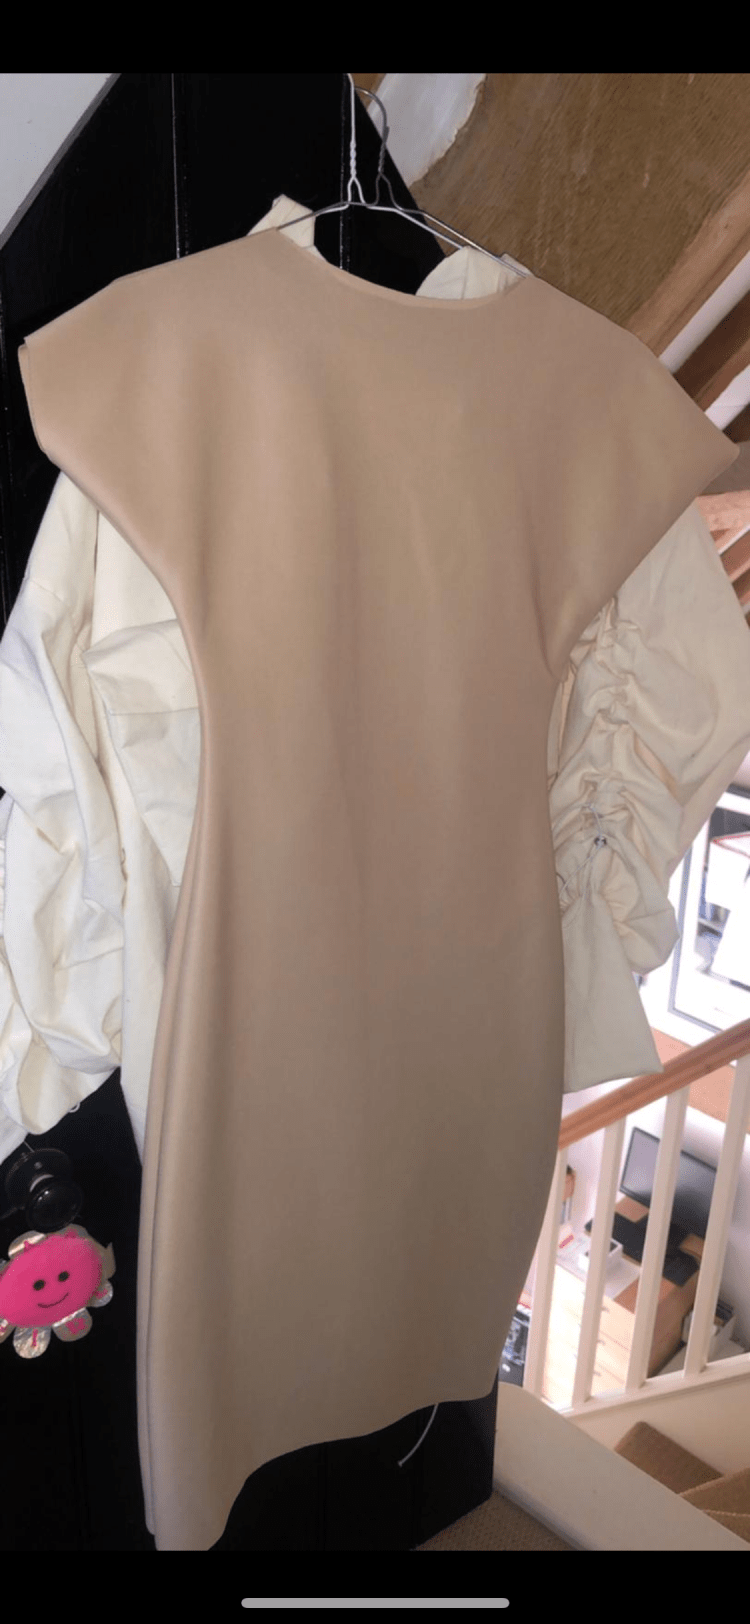
With the dress, once I added the casing for elastic I was really unhappy with how it sat one the dress.

thumbnail_IMG_6643

This meant, I had to re-create the dress but this time I did not put the casing onto the dress and it looked much better without it. At the moment the dress is still working progress as I have had time off from making it to get inspiration on what I could do different with it.

IMG_6407

After this, I started on my top. With my top, I made quite a few changes to it as I wasnt happy with the toile piece as said before. The changes I made were adding buckles onto the front, which could be done up to your desire, the sleeves were straight lines sleeves with the cream casing on them except, they didn’t have elastic in them.

I left the hemming of my dress last as I wasn’t too sure on what to do. However, after experimenting with different style stitching on the machine I decided the sleeves and bottom of dress with be hemmed with an embroidery stitching which would be in black to as some small detail to it. I am really glad I experimented with stitching as it would look really good on the dress.

IMG_6651

development

My development within this project has started off well, I have been Able to research a lot of designers and inspirations that I have included into my research book to help me design potential outfits for my mini collection.

As my theme is more based on utility, simplicity, and against the norm within fashion, I mainly focused on this subject. However, within my research book, I did Also branch out on a few topics within my book  showing I have explored various topics, and where these could potentially lead.

One of the topics I looked into was manipulation fabrics. Within this topic, I researched weaving, dying fabrics, heating fabric, traditional stitching and Many more. One of my favourite manipulations was the heated fabric technique. However, with the current situation with Uni I was unable to develop this technique onto one of my designs which means the garment won’t have any manipulations on it. But, with my sample pieces, I might demonstrate where they would go on the outfits.


During my research on manipulations, before the lockdown, I was looking into traditional stitching and how I could use it inn my designs but re-vamping it to make it have a modern twist. These were the examples that I had created.


With my research book I also looked and styles and silhouettes for my potential designs, the main styles I liked was an oversized jacket, tight fitted dresses or bodysuits and cut out pieces to show the under layering of the clothes.

IMG_5753

Before the Lockdown, this was my final 3 designs. However, with being stuck at home, I had to change a few ideas and develop my outfits to meet the desired expectations whilst actually being able to construct them myself.

This meant, the bodysuit and one top would unfortunately not be made. But, I would incorporate their key features into the garments I would make.

digital posts

Digital side of this project has been quite challenging for me as I have been wanting to develop my knowledge on digital to create a portfolio that looked more professional.

With Jorgie’s help with 1:1 tuition and our weekly lessons I have been able to add and edit my photos or mood boards to make it look more interesting and personal.

I wanted to keep my digital portfolio quite simple and straight to the point to make it understandable for viewers.

I have also been able to illustrate onto these pages using Wacon. However, I haven’t got the hang of drawing my designs just yet with the pen tool. But I was able to illustrate using it and will continue to develop my skills over this time to become better and drawing with this technique.

Within these past few weeks, whilst being at home I have been able to watch many more tutorials online to help illustrate a professional portfolio. With the help of these, my line up and fabric development pages have much more detail and personal touches to them which reflect me as a designer. Here below is my line up and fabric development pages.

line upppp.exrange 2 exfabric dev.exdev2 .pex

So far, I am really pleased with my digital work and have taken a lot of time to create the best that I could. I do feel as though I have found myself more during this project as well, enjoying it a lot more as well. My digital work will have a few changes to it by the time I submit my work, but looking at it, I do believe it reflects me personally.


Inspiration/Ideas

As this project is all about us, I was really excited to start looking Into my own inspirations and explore who I am as a designer. One of my biggest inspirations is obviously streetwear Utility with its detailed stitching, chunky, noticeable zips, over exaggerated pockets and the edgy yet simplistic twist to the designs.

BIG INSPIRATIONS-

KEY DESIGNERS:

my key designers have definitely been Alexander McQueen, KANYE WEST, TTSWTRS and Dion Lee as they all have their own, unusual twist to them with a hint of street style. However, what I love about them is they’re all extremely different to one another and express different stories or beliefs.

KEY TRENDS:

my key trends have also been neutral colours, simplicity and subverting the norm. I decided to briefly look into Gender class/ supervening the norm within this project as I really like the idea of an oversized unisex look on my desired model as well as it clashing with that tight fitting underneath it. However, looking into this topic really interested me which gave me the idea to further research it for my dissertation prep.


I want my mini collection to have oversized, dramatic features to them, yet have a simplistic, neutral look to them.


WEEK 5 BTBC

This week was focused on adding to our already existing businesses plants to achieve high marks. We looked into referencing and was research we would need to explain and back up why we would want to do certain decisions.

With my simply do platform, I knew I needed to research into why I would want to set up an online business instead of a shop etc. For the research I looked into the way were the main ways people shopped and where were the most popular shopping centres to weigh it out.

With my research I also looked into costing as this was quite challenging for me. I decided to look into factory costs, website costing, ad costs etc to create a gross profit sheet and a profit loss sheet. Creating these sheets definitely helped me to see what a real life business would cost me and how much I could profit.


WEEK 4 BTBC

During the first part of this week we looked into how we would brand our logos. Our lecturer showed us various business cards and sites such as solo press, adobe spark post, Hoote site etc in which we could use to promote our small businesses I quite enjoyed this lecture as it was looking more into the creative side of a business Once looking through different style business cards we were able to create our own cards on photoshop or illustrator. 

Creating a business card for my business would defiantly benefit me as it is a way of getting my name out there easily with my details incase anyone had enquiries.

I decided as my business is focused on futuristic shoes, I wanted my card to portray that sense as well. The card itself would be matte black with the logo being a glossy finish on top. 

During the second part of the week we had our presentations.


Design a site like this with WordPress.com
Get started